Saturday, March 8, 2014

Casting a large shadow

Hey Everyone!


Glad you could come back to see my next blog! This blog will focus on the elements and techniques of how to do Shadow Mapping.


Well firstly I should answer the question that is floating around most peoples heads: "What is Shadow Mapping exactly?". Well that would be an excellent question, however the answer lies directly in the name of the technique. Shadow Mapping is literally mapping where a shadow would be placed in perspective to the light. Testing and seeing if each pixel that is on the terrain or surfaces is within shadow IE: If in the lights perspective the LIGHT Z coordinate isn't the same as the Z in our EYE space then yes the vertex is in shadow.

What I mean by that, is that we all see the world around us out of our eyes, in a game we see the world around us through a camera and a projection of that world. Well lets just think for a second, what casts shadows? Light! Exactly, so to find out if a shadow is going to show up in our projection (camera) eye space of the world, we need to see the world from the lights perspective first!

How do we do this? Well the answer to that is quite simple, we know for a fact that we can project the world through a camera, so we can see what is around us. What if we simply put the camera in the exact same spot as the light and made sure it would be oriented the exact same way the light is. Well then we could see if shadows were being cast couldn't we?

That brings me to a problem though, how do we get the camera there? Well we cant just translate it there and expect everything to work because we need to make sure that the vertex (point we are checking) is also the in the lights view.

I found this small little graphic that will hopefully help spread some light on the topic (punny)

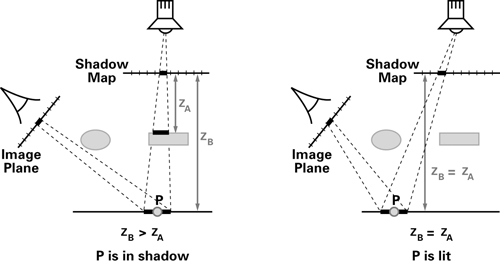
So as you can see in the graphic the image place, is the camera, eye position and then we check the lights position as well, and for each surface we check if the Z of the light is equal to the Z of the camera. If not then the surface is not lit, and the color is changed to a darker version of what it was before.

In essence that is how we do shadow mapping. However there are some issues with shadow mapping that maybe you can get some ideas on how to fix by looking at a few more graphics that I found on the internet.

Basically because we are looking at individual pixels, and Z coordinates at the edges of objects their shadow will be boxy and not clear cut. Of course this is because when a surface is not lit we change the color to a darker one, however that color will be spread across that entire pixel, therefore we will always have pixels that are darker when they might be lit. Another issue along the same lines is that, often we will find pixels that are darker because they are in shadow and all of the sudden BANG! You have the pixel right next to it that is completely lit, which again contributes to the blocky shapes and artifacts on the outside of a shadow.

Knowing those pitfalls I want to show you guys those graphics that represent those issues, and if you do find a way to stop that from happening without actually changing the complete technique (Ie Choosing a new way of doing it). Then you might just be a genius because gaming companies have been trying to fix this issue for such a long time that they have now moved to a different standard technique :(. Anyhow here are those images.

In this image they have attempted to reduce the amount of artifacts in the right side by blurring it (Sometimes works but degrades the quality of the shadow).

This is a perfect example of what I am talking about, check this one out.

Alright! Well that is it for now on shadow mapping, now do remember I actually didn't go into detail on how to move the camera to the lights perspective, PLEASE do message me or comment here if you would like some MATHY stuff on that, I absolutely can oblige! 

Thanks for checking this blog out today guys!

Have a great one,
Until later,
Stephen Krieg


Sunday, March 2, 2014

Woah, Back to action! All about the bloom!

Hey guys!

Sorry ive been so disconnected lately I had a lot going on while my reading week was ongoing. Therefore I missed about 3 blogs :(.

Now that ive gotten through the apologies through, I would like to continue on to the topic for today! HDR Bloom. For those of you who have no idea what Bloom is, I can explain using some easy terminology.

Bloom is the effect that you get when its raining and the light from a light source, almost blurs off the side of geometry bleeding onto other objects that would normally not have that kind of lighting affect it.

For example, if it is night where you are, go ahead turn off the lights and then go to your desk, turn your desk lamp on, then go ahead and squint while you look at the light. You will notice that the light blends and bleeds off the actual lamp light. That in essence is what we are hoping to achieve with bloom.

Bloom makes the entire scene look almost richer, and gives some games a nice dynamic and realistic look. This gives game developers the ability to make their games look nice while still providing game play with almost no cost. Bloom above everything else does allow a nice effect on lighting while still having the efficiency that they need to make other effects happen.

Before I go any further I am going to actually show you what Bloom is! Then what we will do is go over what exactly post processing is, and how do we do it. Then after that I will get some light explanation on how to make bloom happen in a game!

Here is a nice picture of what bloom will look like in a game. Source

If you look at that image, you will see that it looks a bit foggy and rich, especially around the light sources. This effect is not terribly expensive, however it does give a rich look.

So a bit of information on Post Processed effects, this technique is relatively new to the industry and has not been around for all that long. The ability to apply these effects to an entire scene is very innovative moving forward towards a new gaming industry where we can pull out more effects by filtering and applying those filters. 

Post processing by definition is: The term post-processing (or postproc for short) is used in the video/film business for quality-improvement image processing(specifically digital image processing) methods used in video playback devices, (such as stand-alone DVD-Video players), and video players software and transcoding software. It is also commonly used in real-time 3D rendering (such as in video games) to add additional effects. As depicted by Wikipedia : Source

So to get an effect like bloom you have to take four steps. That is it four steps to get an amazing effect like bloom! 

Step 1: You need to render the entire frame to a FBO (Frame buffer object) rather than the back buffer/screen like normal. We will call this SceneFBO

Step 2: You need to do something called tone mapping which is the process by which you can map the specific tones of an image. For example you can map the white out of an image using tone mapping because white is a specific tone. In this case we will be using tone mapping to find the white/brighter areas of the image so that we can do effects on only the light elements of the scene. So we take these light areas ONLY and print them to another FBO (Frame Buffer Object) we will call this ToneFBO

Step 3: Take the ToneFBO, and we will use a KERNEL or a CONVOLUTION filter to blur the image, what this will do is give us the blured foggy effect that we saw in the original image. Once that is done we will take the ToneFBO and send it to one last FBO, we will call this one BlurFBO.

Step 4: This last step is really easy, we will take our SceneFBO and add the BlurFBO to it, what this will do is blend the colors in both of them, remember that the BlurFBO only has the blurred light elements in it, so when we add and blend these together we will get much brighter lights, along with the burred edges along everything that is lit. Giving us that foggy effect that really enriches the elements of the scene.

That is my friends FBO's and BLOOM. If you have any questions please do feel free to leave comments on this blog, I will be posting more as we move forward! Look forward to the next blog tomorrow!

Have a good one guys!
Regards,
Stephen Krieg